Showing posts with label chocolate. Show all posts

Friday, August 28, 2009

Amaretto Tiramisu Cake --- The Ultimate Celebration Cake !!

“ In love the paradox occurs that two beings become one and yet remain two.”-Erich Fromm


When you meet the person you want to spend the rest of your life with…you want the rest of your life to begin soon. Well this is what exactly happened when we met.

Its been two years since our wedding and am still amazed at how fast time flies.
I am madly in love, (more than ever) with the man I married two years back!!


I am the sort who loves both giving and receiving surprises….however small they may be. So had been preparing for the day excitedly…almost feverishly, for the entire month.
(That explains the silence at Zaayeka!)

And since we are out and out foodies….I had to quite literally whip up a storm, first in my head and subsequently in my kitchen.


Why in my head? Well, as you know by now, I love experimenting in my kitchen, pushing my limits and trying things I have never tried before. Barring a few delicacies, I try not to repeat a dish. (I have this personal desire to be able to make to as close to perfection, if not replicate, all the dishes of the world. Yeah I know quite a thought, but trust me I sometimes feel a life time is too short to try all the dishes existing on planet Earth.)

I love my man and as most of you will identify with; we blog-bakers want to show all our love with what we bake/cook in the kitchen. It was ‘our’ anniversary so had to bake a cake nothing short of gorgeous, both in taste and appearance.
Have baked quite a few cakes before (a few still unposted, rest in the archives) mostly using fruits as I love fruits in my cake. Hub however doesn’t care much about fruits in his desserts.


Black Forest Gateau was done last year, Red Velvet cake was for friendship day, Peach torte was for no good reason, Pineapple cheese-cake was just-like-that, Mango pastry went with a courtesy visit to a relative, Citrus cake for an in-law’s birthday……honestly my choices were getting limited in terms of cakes/tortes. Googled a lot and suggested recipes to the hub, each went into the recycle bin with a shake of the head.

(Did I forget to mention quite unlike me he gets picky when it comes to desserts and can gladly skip chocolate. Me on the other hand loves anything with chocolate.)
The cake had to satisfy all the criterions… have chocolate without being too chocolaty, have some sort of nut without being pronounced, no fruits, had to be a layer cake etc etc…S-I-G-H !!


Last week while I was lying wide awake in bed at night, it hit me that I have never made Tiramisu..yet! Then the next thought was can I make a Tiramisu cake?! Told hub excitedly next morning…..he was fine with that but was a little inhibhited about that much coffee in the cake.

Now, we ‘like’ coffee but do not ‘love’ it. An occasional frappe or something is fine, and when I use coffee to give depth to my chocolate cakes is admissible, but that is it. (We don’t take tea or coffee frequently. We are flavoured-milk children.) ;p


Back to square one….thought and thought and thought when luck struck! I was rummaging through the cupboard when I noticed this unopened bottle of Amaretto staring back at me. Tan-ta-ran!! My glee knew no bounds. Headed straight to the kitchen to live the dream I had just seen with wide-open eyes.


This cake was a real delight to make, spread over three days, plus two days to let the flavours set in and mingle before D-day arrived.

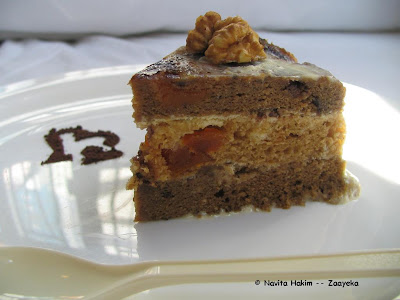
Instead of the lady fingers I made a regular genoise (yes with clarified butter/ghee). The crumb/texture of the genoise was light, tender and moist. Sliced it into two. Baked another layer of chocolate sponge, only this time with a little more coffee.

Was still apprehensive about the taste as I have never tasted an Amaretto Tiramisu ever. So to atleast make the cake look appealing decided on making a chocolate rose…yet another first!

** Will add a video-tutorial later,(without the use of corn syrup). In the mean time for those of you who cannot wait here is the link from wherein I got my inspiration.


Made it right after I made the sponges and was pleased with my artistry...more so this successful rose gave me the courage to go ahead with the rest of the recipe I had decided…kinda’ good omen. (fingers crossed!)

Enjoyed making mascarpone. Luxurious and indulgent. Touched up the mascarpone ganache with some semi-sweet chocolate chips and strong brewed coffee. Decided on a plain white amaretto-infused-mascarpone icing.


A day before D-day finished the icing et al, sans the chocolate rose. Wanted to surprise the hub, by placing it at the last minute.


Cut it at midnight and can’t express the feeling of this creamy heaven in the mouth. YUM!

Hub was delighted beyond words and kept admiring the rose while spooning the relish into his mouth…before the congratulatory calls inundate ‘the moment’…..lol.
As for me, I was glad he loved it, though he didn’t say it in words…his eyes said it all.
(My man is of few words….one of the reasons I fell in love with this man-boy, and still so in love with !) *blush*


Amaretto Tiramisu Cake

Ingredients-


For the Mascarpone Frosting-
1 lt. low-fat cream (25% pasteurized)/organic cream
1 1/2 tbsp fresh lime juice

aprrox. 7 tbsp confectioners' sugar

(frosting/icing)
1 tbsp amaretto liquer, plus extra for soaking the sponges

(filling/ganache)

1/2 tsp strong brewed coffee
1/3 cup semi-sweet chocolate chips,melted/microwaved on high for 30 secs.


For the Plain Genoise-
3 tbsp clarified butter/ghee
1 tsp pure vanilla extract
1 cup all-purpose flour
4 large eggs
2/3 cup fine granulated vanilla sugar/plain sugar


For the Chocolate sponge-
2 eggs
1/3 cup plain flour
3 tbsp unsweetened Dutch process cocoa powder
1 tbsp instant coffee powder
2 tbsp butter at room temperature
1/3 tsp baking powder
1 tsp corn starch
a pinch of salt
1/3 cup fine granulated sugar

Flaked almonds for decoration


Method-

First prepare the mascarpone.

Bring about 2 inches of water to a boil in a wide skillet. Reduce the heat to medium-low so the water is barely simmering.
Pour the cream into a medium heat-resistant bowl, then place the bowl into the skillet. A double boiler of sorts. Keep stirring on medium flame. About 15-20 mins of deliacte heating.
Add the lime juice and continue heating the mixture, stirring gently, until the cream curdles.
All that the whipping cream will do is become thicker, like a well-done crème anglaise. It will cover the back of your wooden spoon thickly. All you will see would be just a few clear whey streaks when you stir.
(It will not curdle the way milk curdles when you make cottage or ricotta cheeses.)

Remove the bowl from the water and let cool for about 20 minutes. Meanwhile, line a sieve with four-five layers of dampened cheesecloth and set it over a bowl. Transfer the mixture into the lined sieve. Do not squeeze the cheese in the cheesecloth or press on its surface, it will firm up on its own during the refrigeration time. Once cooled completely, cover with plastic wrap and refrigerate (in the sieve) overnight or up to 24 hours.

Add the confec. sugar to this mascarpone cream and whisk by hand till combined.
Set one third of it aside.

To the remaining two-thirds, add the melted choco-chips and coffee brew. Mix together till you get a creamy texture. This is the filling.

To the one-third, add amaretto and hand-whisk till smooth. This is the outer frosting.


Next make the genoise.

Preheat the oven to 180 degress C. Line, grease and flour an 8 inch cake pan.
Sift the flour thrice.
Bring some water to a boil in a large pan/griddle & reduce to simmer. Place eggs & sugar in a large bowl, whisk constantly over the simmering water, heat the eggs to lukewarm.
Remove the bowl from the pan. With an electric mixer, beat the egg mixture at high speed until it has cooled, tripled in volume, and resembles softly whipped cream, about 5 minutes in a heavy-duty mixer or longer with a less powerful mixer.(I used elbow grease and it took me about 10 mins to get the desired result.)

Sift a third of the flour over the whipped egg mixture. Use a rubber spatula to fold in the mixture-quickly but gently-until combined. Fold in the rest of the flour too.
Then add melted ghee/clarified butter in a stream as you keep incorporating it into the batter. Add the vanilla extract at this point.

Pour the batter into the lined pan and bake at 180 degrees C for 35 minutes or so, till the edges of the cake shrink slightly and the top springs back on touch.
Cool and umould onto a wire rack.

Slice the cake into two once completely cooled or you will risk getting crumbly uneven slices. This genoise stays well if cling wrapped, for 3-4 days in the fridge or upto 2 months in the freezer.


Now for the chocolate sponge.

Seive all the dry items together three times.
Cream the butter and sugar together till pale. Add the eggs and beat well till fluffed up to double its volume.
Fold in the dry ingredients into the wet. Pour into a lined 8 inch cake pan.
Bake at 180 degrees C for 35 minutes app.
Cool on wire rack.


For the assembly----

Place one layer of the plain genoise on the cake serving platter.
Sprinkle with amaretto liquer.
Top with some of the filling. Place the chocolate sponge layer next.
Sprinkle this with amaretto liquer too.
Top with the filling. Place the final/top genoise layer.
Sprinkle with amaretto liquer.
Spread the mascarpone-amaretto frosting on top.
Spread the remaining filling on the sides of the cake.

Decorate the borders with almond shavings.
Adorn the cake with the chocolate rose and leaves.

Note: I did not use any simple syrup to soak the sponges as the Amaretto liquer is sweet. If you desire you can add sugar to the soaking syrup, for a sweeter cake.


Also, made....
Mexican Chicken Pizza


and Tandoori Paneer (Barbequed Cottage cheese) Pizza


alongwith some sun-dried tomato pesto layered garlic rolls


....for a truly wonderful brunch.
(Recipes coming-up!)

Friday, August 7, 2009

No-Bake Mirrored Mango Cheese Cake (eggless) …with the goodness of Goji Berries.


Aaaah yes I love mangoes….and I hate it that it’s the tail end of this wondrous luscious’ fruit season here. I have pureed two whole jars of mango and frozen it for…err…a rainy day (in the kitchen). ;p

I love the fruit in its full glory, nevertheless I also like to present its versatility in all forms- shakes, smoothies, ice-cream, mousse, frozen desserts, cakes and currently cheese cake!

My readers would know I am an incorrigible fruit-dessert person of the first order.
Check out the archives at Zaayeka to know more about dragon fruits, persimmons, walnuts, bananas, strawberries, almonds, chikoos, and what not you can do with them!


This cheese cake wasn’t a result of an idle summer afternoon, to while away time in the kitchen…but a carefully thought out plan to create yet another magic with mango.

I just had to make something delectably rich yet light and almost decandent in taste, a spoonful of which melted in the mouth to release just a monosyllable….mmmm !!


I was scouting for a good mousse cake recipe but almost all had egg whites which went uncooked. Somehow I am averse to the idea of uncooked eggs in my dish. So I settled for the no-bake idiot-proof cheesecake instead.


When searching for a recipe I generally review quite a few before I start in the kitchen. More often than not the recipe I use in the end is not a replica of any one recipe but is inspired by two or more recipes give or take a few changes here and there to suit the tastes, ofcourse all in my head! I take the risk, try it in my ‘lab’ (read kitchen) and not to boast but 8 out of 10 times it’s a success. Only then do I post it for the world here.

(And you thought food blogging was easy!!) :p


This recipe I discuss here does not use store bought Philadelphia cream cheese. (I import mine so have saved it for less glorious fruits. A mango can carry the dessert on its own shoulders unaided.) ;p
I made my cheese at home using whole milk. I used one litre of milk to make the cream/curd cheese. It is not mascarpone or quark or greek yogurt or hung curd for that matter but very similar though in terms of the making process and subtly differs from them in textures and taste.

The only thing that was store bought was 25% Low Fat whipping cream.
(Well technically….. I already had that in my fridge, I always keep a one litre pack at hand. Call it hazards of being a foodie.)


It was all good…till I opened my fridge door rather hard resulting in a packet of goji berries falling off the door rack (which I bought from a local while trekking in the Genting hills)….ok so they wanted to go in too.. added them to it.
Turning it into a ‘tasty’ and ‘healthy’ treat!!

Then went a step further to try and mirror it...for 'glamour' (chuckle). I know this reads more like a fashion blog than a food one. C'mon even foods need to sit pretty.

My first foray into "mirror-ing" was not a grand success though.
Used a little mango juice & gelatin, it set well but I had pressed cling foil on top to avoid forming crystals when in the fridge,which resulted in an uneven edge to the mirror. :(

Nevertheless I ate all the uneven-edged slices myself so what was served on the platter to the hub and the guests was smooth looking savvy mirrored cheese cake.


Mirrored Mango Cheese Cake …with the goodness of Goji Berries
(This recipe makes a 6x4 inch square cheese cake. )


Ingredients:


1 litre full fat/whole milk
1 tsp citric acid
1/2 cup warm water
2 mangoes- peeled,cored and pureed
1 cup low fat cream
3/4 cup castor sugar (adjust according to sweetness of mangoes)
2 tbsp chopped goji berries (optional)
10-12 graham crackers/digestive buiscuits, crushed
1 tbsp butter at room temperature
1 tsp gelatin
2 tbsp water
5 tbsp mango juice
a dash of lemon juice


Method:


Mix the crushed biscuits with the butter. (I added a little cocoa powder too but it can conviniently be skipped.)
In a greased tin foil or spring-form pan (I didn't have a springform pan, so I used a regular tin foil) spread the buiscuit mixture. Press to form a firm base.
Leave to set/harden in the freezer.


Put the milk to boil in a thick bottomed pan.
When it comes to a boil, remove from the flame and keep aside for a few minutes.
In another bowl, mix the citric acid crystals with the warm water.
Pour this mixture into the hot milk and allow to stand for about 5 minutes till the milk curdles on its own. Stir gently if required.
Strain this mixture using a muslin cloth/cheese cloth (double layered).
Hang it for 2 hours in the fridge, with a cup below it to collect the whey.


Now, liquidize the prepared cream cheese, sugar, mango puree in a blender.
Whip the crean till soft peaks form and ever so slightly fold in the cream cheese-mango mix.
Add the chopped berries at this point. Cool.
Pour this over the biscuit base. Leave to set in the fridge, for atleast an hour or two.


For the mirror, put 1 tsp of the gelatin in 2 tbsp of water to bloom.
Heat this over low flame till all the gelatin dissolves. Quickly add the mango juice and the lemon juice. Stir continuously to avoid forming lumps.
Pour this over the set cheesecake. Tap the tin foil/pan to eliminate the bubbles.
Allow to set in fridge overnight.
When serving dip your knife in hot water to cut smooth slices. Enjoy!!!

Thursday, February 5, 2009

Persimmon-Walnut Torta Claudia À la mode....& a sweet interlude !


My therapist told me the way to achieve true inner peace is to finish what I start. So far today, I have finished 2 bags of M&M's and a chocolate cake. I feel better already.

I am on the 12-step chocoholics program: I am never more than 12 steps away from chocolate!


Smile! Yes thats what I am doing as I write this post. I am not a quitter...I will NOT give up chocolate ever. Add chocolate to almost anything and it turns out superb. (I am solely referring to chocolate in the sweet form, please.) This cake is a twist to the old fashioned Italian torte.

My first experiment with persimmon was a grand success and so I decided to include this exotic fruit in a cake, till this wonderful recipe almost serendipitiously fell in my lap.

Now my hub's colleagues all know about my madness in the kitchen, the love of food and the enthusiasm I have for my blog. So one kind soul passed me a recipe which she had read somehwere about this gorgeous torte. As usual the creative devil (or angel?!) in me changed it a bit here and a little there to make this famous torte...my way!
Quite in time for the anniversary of my marriage registration last year. :)


A layer of spiced persimmon torte sandwhiched between two chocolate cake layers with luscious smooth chantilly and a kiss of rum/brandy.

It takes about an hour to prepare this classic creamy layered torte and it tastes best when chilled for atleast four hours.


This torte carries a special meaning for two reasons. First, its exclusivley for my hub...the love of my life. I can't thank God enough for His match making skills. ;p Second, I had promised myself that I would create new things that I have never tried before at the onset of 2009. And I for one keep my promises. (wink wink)


As promised this cake turned out great and it was an extremely satisfying experince baking it. Its been only a couple of months since the last cake I made exclusivley for my darling...and I am very happy at the result.


I used plain walnut-chocolate chip pound cake instead of the Pan di Spagna which is quite similar to Genoise. It's a simple cake whose major function is to serve as a base for layer cakes, roll cakes and so on. Its characteristic is in that it uses bakers' yeast, which I have conveniently traded for chemical leaveners like baking powder/baking soda (found in self raising flour). I also added ground walnuts to give it a rich flavour.

For the persimmon layer I used the fruits' puree as well as chunks, for the surprise in the mouth. And ofcourse I added extra chocolate chips in all the layers. :)


Persimmon Torta Claudia À la mode
Ingredients-

For the chocolate walnut layers-(two 8" layers)
1 1/2 cup self raising flour
1/2 cup ground walnuts
1 1/3 cups sugar
4 eggs, separated
1 tsp vanilla extract
butter for greasing the pan
1/2 cup cocoa powder
1/2 cup semi-sweet chocolate chips
1/2 cup softened butter

For the persimmon layer-(one 8" cake)
1/2 cup persimmon puree
a few chunks of chopped persimmon(optional)
1/2 cup semi sweet chocolate chips
3/4 cup self raising flour
1/3 cup sugar (adjust according to tartness of persimmon, mine were very sweet)
2 eggs, separated
1 tbsp softened butter
1/4 tsp nutmeg
1/4 tsp cinnamom powder
1 tsp rum (optional)

*A couple tablespoons of Brandy/dessert wine (eg.Marsala from Sicily)


Chantilly-
1 cup of whipping cream
1/2 cup + 2 tbsp of icing sugar
a dash of vanilla extract

**Mix all of the above and whip till the cream becomes frothy. Refrigerate.


Method-

For the chocolate walnut layers-
Preheat your oven to 375 F (185 C).

Beat the yolks, butter and sugar until the mixture is pale yellow, light, and has expanded considerably in volume (tripled or more).
Whip the whites to firm peaks. Fold them into the yolks, and then fold the flour,cocoa powder, ground walnuts and the vanilla.
Finally, add the chocolate chips.
Grease and flour a fairly high-sided round 8-inch pan. Bake for about 40 minutes or until done (a toothpick inserted will come out dry, and the cake will pull away from the sides of the pan).
Turn the cake out onto a rack to cool.

For the persimmon layer-
Preheat your oven to 375 F (185 C).

Sieve the flour with the nutmeg and cinnamon.
Beat the yolks with the sugar and butter till creamy and pale yellow. Add the rum. Add the flour mix. Then add the persimmon puree and mix lightly together.
Beat the egg whites till they form soft peaks. Fold in the whites into the yolk-flour mix.
Finally add the chocolate chips and the persimmon chunks.
Bake for approx. 30 minutes, keep a check till done. Let cool once done.

For Assembly-

Begin by cutting the chocolate cake once , so as to get two discs.
Place one of the discs on the serving plate/table top. Sprinkle with a little brandy/dessert wine.
Spread a layer of the whipped cream on top of it.
Place the persimmon layer next. Sprinkle this, too with some brandy.
Then spread the whipped cream over it. Cover everything with the last chocolate layer, pressing gently so it sticks.
Chill the cake in the refrigerator (not the freezer) for 4 hours.

Remove the cake from the refrigerator and pour the remaining chantilly over the top of the cake. Decorate with walnut halves. Chill.

Serve this delight and fascinate yourself and others! :)


This is in honour of the celebration of love....our love, this valentine month. I share this recipe with The Alchemist Chef.

Also, in keeping with the 'nuttiness' I also share this with Aquadaze.


An Interlude---

Friends, I am off to Malaysia for a week, to celebrate with my valentine. Hence, will not be here on the blogosphere, wanted you guys to remember me with something sweet...so this post. :)

(I secretly hope that I will be missed...ok I know its not a secret now !) ;p

Keep smiling and do share your views. Will be back soon. :)

Tuesday, February 3, 2009

Dragon-fruit Double Chocolate Brownie with Chocolate Dulce de Leche


"I have this theory that chocolate slows down the aging process.... It may not
be true, but do I dare take the chance? "


The first time I ever ate a brownie was at Nahomes’ in Kolkata, India. It was during school days, that a christian friend of mine introduced me to the oldest bakery at New Market in Kolkata.I never had tasted anything quite like it and since then brownies took over the top spot of cakes in my ‘love-it-list’.

I loved placing bets..still do.. (mostly because I won....and before your mind starts wandering, it was just for fun and strictly non-monetary) on silly things, like “you bet we won’t have tuitions today”…or “I bet the project submission dates will be extended..” etc etc.

And the prize would always be (yes you guessed it !) either a Cadbury’s Perk/Crackle or a Nahomes’ Brownie.

FYI- I still place such bets and almost always win!! ;p


The most important aspect of a brownie, for anyone who loves brownies, is texture.
I generally prefer a brownie, somewhere between chewy and fudgy. However I made this of the third kind—cakey.

A cakey brownie has a moist crumb and a slightly fluffy interior. The batter contains less butter than the other recipes, and I include milk for moistness (the milk is a great way to extend a brownie's shelf life). I don't use much flour and while brownies don't usually use chemical leavens, I add some baking powder to keep this cakey brownie light.

When I mix cakey brownies, I use a bit of cake-baking technique, too: creaming the butter and sugar first (rather than melting the butter) and then whisking the batter to aerate the mixture and get a light crumb. I think this brownie improves on sitting at least one and even two days after you bake it.


I used dragon fruits in this brownie to give it an exotic taste and feel.

As we all know I love experimenting with different flavours and cooking techniques in my lab...err..kitchen. Take for example the microwave tarts , chana dal medhu vada, fruit and nut malpua, steamed squash dumplings, my exotic trifle, macha tea & coffee cake, chives n shrimp balls, my style krusczyki, chicken lollies....and the list continues! ;p


Dragon fruits-
A pitaya or pitahaya is the fruit of several cactus species, most importantly of the genus Hylocereus (sweet pitayas). These fruits are commonly known as dragon fruits.

By eating the highly nutritional pitaya fruit, you gain all of the general health benefits of the pitaya nutrients simply because pitaya fruit is a great all around healthy fruit to eat with lots of beneficial nutrients which are readily metabolized from the natural pitahaya fruit (For example, dragon fruit vitamin C is more easily absorbed than vitamin C from a pill supplement).

One special health benefit of dragon fruit is that ot helps control levels of glucose blood sugar levels in type 2 diabetes. Its a store house of dietary fibre and Vitamin C.


Dragon-fruit Brownie with Chocolate Dulce de Leche

Ingredients-
Dragon-fruit Brownie

1 1/4 cups all-purpose flour
1 tsp baking powder
1/4 tsp salt
1 cup + 2 tbsp granulated sugar
1 cup semi sweet chocolate chips
1 tsp instant coffee
1/2 cup margarine
2 eggs, beaten
1 teaspoon vanilla extract
1/2 cup dragon fruit pulp & juice
¼ cup or less warm milk


Method-


Preheat oven to 375 degrees F.

First sieve the flour, baking powder, coffee and salt. Keep aside.
In a bowl, whisk the sugar and margarine with vanilla extract. Add half of the milk to this.

Microwave the semi-sweet chocolate chips for 1 minute, stirring occasionally.

Cut the dragon fruit in half and scoop out the pulp with a spoon.

Note: Since the seeds are slightly bitter in taste, I used half the pulp; and used the juice of the other half (with a strainer).

Whisk the wet ingredients into dry. Add the pulp and the dragon fruit juice to this. Add more milk, if required. Pour in your choice of baking tray.
Bake for approx. 30 minutes. Keep a check.

Tip: Brownies are done when the toothpick comes out with a few moist crumbs still clinging. It's okay for the pick to look moist, but if you see wet batter, keep baking.

One last word: although it's awfully tempting to cut into a pan of just-baked brownies, hold off. The flavor and texture of this brownie will be at its best—and definitely worth waiting for—when completely cool.


I made two brownies and sandwhiched them together with a layer of chocolate buttercream in between. You can try this icing too.
Then topped my brownie with some fresh Chantilly and drizzled with the Chocolate Dulce de Leche .


For Chocolate Dulce de Leche-
(This is my version for simplicity sake!)
I added chocolate chunks to the condensed milk to add flavour. You can use your choice of flavouring or keep it plain too.


In a microwave safe pie dish, empty half a can (200 gm/7 ounces) of condensed milk. Add ½ cup semi-sweet chocolate chips over it. Stir in a pinch of sea-salt.
Cover tightly, twice with MW safe cling foil.
Place this in a deeper baking tray (MW safe) filled a little over half with water.
MW on medium high for 8-10 minutes. Keep checking mid way through.
(Adjust time/temperature setting according to your MW oven).
Once done, let cool. Whisk until smooth.
Store in the refrigerator until ready to serve. Warm gently in a warm water bath or microwave oven before using.


Now for some history lesson--
It is said that Dulce de Leche originated in Argentina in 1829 in the providence of Cañuelas in Buenos Aires. Two opposing forces were on the brink of ending a war. The General Lavalle and the General Manuel de Rosas came together in order to make a treaty.

The General Lavalle arrived very tired at the campo of General Manuel de Rosas. Manuel de Rosas wasn’t in the camp at the moment so General Lavalle entered into his tent and took a nap.

While the General Lavalle was napping a serving woman was preparing “la lechada” for the camp. “La lechada” is prepared by heating sugar and milk. The woman went to speak with the General Manuel de Rosas in his tent, but when she entered she discovered the enemy. She didn’t know about the treaty the two generals were about to make, so she ran to find soldiers.

The General Manuel de Rosas arrived moments before the soldiers, and stopped them from waking the sleeping General Lavalle. In the chaos, the woman forgot about “la lechada.”
When she remembered and checked on “la lechada,” she noticed that it had become a dark brown jelly substance. It is said that a very (brave) and hungry soldier tried the jelly and then dulce de leche was born.


---------------------------------------


I send this to Lore of Culinarty, for her monthly event.


Also, this was a dry run for my Valentines' day dessert recipe. Wait and watch for Feb 14th! :)
I share this lovely dessert with The Alchemist Chef's Valentines' Day Recipe Competition, who is striving to have a great collection of recipes before the "Celebration of Love" day !
--0--
Another V-day giveway notice( if it interests you)--
Check this place for a surprise V-day basket of goodies!

Sunday, January 18, 2009

Vegan Banana Chocolate Bread..a slice of goodness!

The banana plant is not a tree. It is actually the world's largest herb!


As my regular readers would know, that I like to dig up dirt..err...history about the food I eat. Although I may not be a food historian(as so many of you have asked me), but you can trust the information you have here to be true and reliable. Afterall, I wouldn't tell you things I did not believe in. However (as a disclaimer), still the content here are only my humble views/finds and your discretion is advised. ( ahem! I sound so formal..)

The food we eat always has some story attatched to it...and I like exploring them. It can be a simple burger, the humble dal, a rustic gatte ki sabzi , the medicinal use of spinach dumplings, or the new experience of the khasta kachori,the sweet story behind the torte,the tradition of the challah, the love story in the gateau, or the history of the speculas, or even the twist in the krusczyki ...and lots more that you get to read here at Zaayeka.

I love to share ...so alongwith the delicious recipes I share the 'his'-'story' of the food too. You sure want to know all about the stuff that goes on your plate...and eventually in your stomach. The story intrigues...it excites..it informs, and at times I have used the stories alone to feed kids....they eat it all up ....just listening to all the interesting anecdotes about the food.


Coming to today's recipe I made this delicious and healthy Vegan Banana Chocolate Bread. This is my first foray into vegan cooking. Its rich with the banana flavour and so moist it practically melts in your mouth. A must try if you are going to have guests over; as the bananas spread their fragrance...right through from the oven in your kitchen into the whole house (you don't need to spray any room freshener) and enticingly welcome your guests, making them feel at home instantly!


Vegan Banana Chocolate Bread
(The recipe is adapted from here.)

Ingredients-


1 cup self-raising flour
1/2 cup + 2 tbsp whole wheat flour
pinch of salt
1 tsp baking soda
1 cup caster sugar
3/4 cup margarine/vegetable fat,softened
1 tsp corn starch
1 tsp pure vanilla extract
3 large bananas, mashed to pulpy form
1/2 of a large banana, sliced
1/2 cup chocolate chips
1/2 tsp nutmeg powder
1 tsp cinnamon powder


Method-
Grease a bread loaf pan and set aside.
In a medium mixing bowl combine the flours,baking soda,corn starch, cinnamon, nutmeg, salt and make a well in the center.
In a separate bowl combine the bananas, sugar, vanilla extract and vegetable fat.
Add the wet mixture to the dry mix, all at once.
Gently but thoroughly bring all the ingredients together with a wooden spoon, then pour into the prepared loaf tin.Fold in the chocolate chips.
Layer the sliced bananas on top.
Bake in the oven for an hour or so (depending on your oven),or until a skewer inserted into the middle comes out clean. Allow to cool for 5 minutes before removing the cake from the tin and leave to cool on a wire rack.

Tip: Since this cake does not contain any protein from the egg, and has mashed fruit pulp, it may take longer to cook. Be patient, but keep checking!


Now for the interesting bit-

The true origin of 'bananas', world's most popular fruit, is found in the region of Malaysia. By way of curious visitors, bananas traveled from there to India where they are mentioned in the Buddhist Pali writings dating back to the 6th century BCE.
In his campaign in India in 327 BCE, Alexander the Great relished his first taste of the banana, an usual fruit he saw growing on tall trees. He is even credited with bringing the banana from India to the Western world.
According to Chinese historian Yang Fu, China was tending plantations of bananas in 200 CE. These bananas grew only in the southern region of China and were considered exotic, rare fruits that never became popular with the Chinese masses until the 20th .
The people in this region were rice eaters, and wheat was unknown here, so breads were not part of their culture.

Theophrastus (a Greek naturalist philosopher) around the 4th century B.C., in what is probably the first scientific book on botany, describes the banana plant. We know that the Greeks made bread with honey, spices and fruits around the time of Pliny (23-79 A.D.), and we also know that Pliny had knowledge of the banana (he also described them in 77 A.D.) So, could the Greeks have made any banana bread? A possibility, they made 'bread' and had bananas.

It was almost 350 years later that Americans tasted the first bananas to arrive in their country. Wrapped in tin foil, bananas were sold for 10 cents each at a celebration held in Pennsylvania in 1876 to commemorate the hundredth anniversary of the Declaration of Independence.
Instructions on how to eat a banana appeared in the Domestic Cyclopaedia of Practical Information and read as follows: "Bananas are eaten raw, either alone or cut in slices with sugar and cream, or wine and orange juice. They are also roasted, fried or boiled, and are made into fritters, preserves, and marmalades."

However, Banana bread first became a standard feature of American cookbooks with the popularization of baking soda and baking powder, in the 1930s (and appears in Pillsbury's 1933 Balanced Recipes cookbook). The origin of the first banana bread recipe is unknown. The home baking revival of the 1960s and the simplicity of its recipe led to an explosion in banana bread's popularity. The cookbooks of the 1960s added to its popularity because they commonly listed multiple variations of this bread that added fruits and nuts.


Bananas & Us--


Anaemia: High in iron, bananas can stimulate the production of haemoglobin in the blood and so helps in cases of anaemia.
Blood Pressure: This unique tropical fruit is extremely high in potassium yet low in salt, making it the perfect food for helping to beat blood pressure. So much so, the US Food and Drug Administration has just allowed the banana industry to make official claims for the fruit's ability to reduce the risk of blood pressure and stroke.
Brain Power: 200 students at an English school were helped through their exams this year by eating bananas at breakfast, break and lunch in a bid to boost their brain power. Research has shown that the potassium-packed fruit can assist learning by making pupils more alert.
Constipation: High in fibre, including bananas in the diet can help restore normal bowel action, helping to overcome the problem without resorting to laxatives.
Depression: According to a recent survey undertaken by MIND amongst people suffering from depression, many felt much better after eating a banana. This is because bananas contain tryptophan, a type of protein that the body converts into serotonin - known to make you relax, improve your mood and generally make you feel happier.
Hangovers: One of the quickest ways of curing a hangover is to make a banana milkshake, sweetened with honey. The banana calms the stomach and, with the help of the honey, builds up depleted blood sugar levels, while the milk soothes and re-hydrates your system.
Heartburn: Bananas have a natural antacid effect in the body so if you suffer from heart-burn, try eating a banana for soothing relief.
Morning Sickness: Snacking on bananas between meals helps to keep blood sugar levels up and avoid morning sickness.
Mosquito bites: Before reaching for the insect bite cream, try rubbing the affected area with the inside of a banana skin. Many people find it amazingly successful at reducing swelling and irritation.
Nerves: Bananas are high in B vitamins that help calm the nervous system.
Overweight and at work? Studies at the Institute of Psychology in Austria found pressure at work leads to gorging on comfort food like chocolate and crisps. Looking at 5,000 hospital patients, researchers found the most obese were more likely to be in high-pressure jobs. The report concluded that, to avoid panic-induced food cravings, we need to control our blood sugar levels by snacking on high carbohydrate foods (such as bananas) every two hours to keep levels steady.
PMS: Forget the pills - eat a banana. The vitamin B6 it contains regulates blood glucose levels, which can affect your mood.
Seasonal Affective Disorder (SAD): Bananas can help SAD sufferers because they contain the natural mood enhancer, trypotophan.
Smoking: Bananas can also help people trying to give up smoking, as the high levels of Vitamin C, A1, B6, B12 they contain, as well as the potassium and magnesium found in them, help the body recover from the effects of nicotine withdrawal.
Stress: Potassium is a vital mineral, which helps normalise the heartbeat, sends oxygen to the brain and regulates your body's water-balance. When we are stressed, our metabolic rate rises, thereby reducing our potassium levels. These can be re-balanced with the help of a high-potassium banana snack.
Strokes: According to research in "The New England Journal of Medicine"eating bananas as part of a regular diet can cut the risk of death by strokes by as much as 40%!
Temperature control: Many other cultures see bananas as a "cooling" fruit that can lower both the physical and emotional temperature of expectant mothers. In Thailand, for example, pregnant women eat bananas to ensure their baby is born with a cool temperature.
Ulcers: The banana is used as the dietary food against intestinal disorders because of its soft texture and smoothness. It is the only raw fruit that can be eaten without distress in over-chronic ulcer cases. It also neutralises over-acidity and reduces irritation by coating the lining of the stomach.
Warts: Those keen on natural alternatives swear that, if you want to kill off a wart, take a piece of banana skin and place it on the wart, with the yellow side out. Carefully hold the skin in place with a plaster or surgical tape!

To health and goodness!

I share this recipe with Sweet and Simple Bakes' current challenge.

Grace for her Cinnamon Celebration. And this goes to Varsha who is hosting the One Page cookbooks' event for the dessert part/section.

A friendly reminder-

Rose (of All about Cakes) who is giving away a 100 piece Betty Crocker Cake Decorating Kit at her blog, to celebrate her 100 posts. Visit her to win the bundle!


Friday, January 2, 2009

Austrian Walnut-Strawberry Torte


One of the very nicest things about life is the way we must regularly stop whatever it is we are doing and devote our attention to eating.
~Luciano Pavarotti and William Wright, Pavarotti, My Own Story


Its new year.. 2009 has officially unfolded itself. Like all true foodies, I begin this new year with 'sweet somethings'.
Thats the tradition in almost all Indian families..we call it "muh meetha karana". Loosely translated it means, 'sweetening the mouth'. Whenever there is a fresh start we celebrate it with sweetness...like I did when I started my blog. So in keeping with the tradition I made an Austrian torte.


A torte is a cake made with many eggs and usually ground nuts or even bread crumbs instead of or in addition to flour.Tortes are Central European in origin. The word torte is derived from the German word "torte", which was derived from the Italian word "torta", which was used to describe a round cake or bread.


I remember when I was a school going kid, my mum used to say that whatever I do on the first of January, I would keep doing that the entire year, so I studied well my favourite subject for sure, apart from having fun that is. I ofcourse was made to believe that then, but now it has stuck with me all these years. I still conciously try to do something nice , share smiles and have fun.
Hence, the torte comes as no surprise, given that I have never tried baking one ever. So something sweet and something different. (A good omen-probably I would be trying new and nice things this whole year!)


Austrian Walnut-Strawberry Torte

Ingredients-
For torte layers-
6 large eggs, separated
3/4 cup plus 2 tablespoons sugar
2 cups walnuts
1 cup fresh fine breadcrumbs
2 1/2 tablespoons your favourite brandy,(I used rum)
1/2 cup cocoa powder


For strawberry whipped cream-
1 cup heavy cream, well chilled
1 teaspoon strawberry essence
a pinch/dab of red food colouring
1/2 cup plus 1 tablespoon confectioners' sugar

a few strawberries, chopped- for layering

For icing- (optional)
1 1/2 slab of dark chocolate (70% cocoa), it should give you half cup liquid chocolate when melted
1 tbsp softened butter
1 tbsp whole milk
1 tbsp confectioners' sugar

Method-

In a bowl with an electric mixer, beat the egg yolks with 3/4 cup of granulated sugar until the mixture is doubled in volume and forms a ribbon when the beaters are lifted (about 5 minutes).

In a food processor or blender, pulse the walnuts with the remaining 2 tablespoons of sugar until ground fine.
(Although coarsely ground worked fine for me. Only it becomes a little difficult when it comes to slicing the cake, but I prefer the 'surprise' walnut chunks in my mouth!)

Add the walnuts, the bread crumbs , cocoa powder and the rum to the yolks and fold gently.

In another bowl, with clean beaters, beat the egg white just to stiff peaks.

Gently and gradually fold the whites into the yolk mixture.

Pour the batter in a greased 9" tin/mould and bake for 20-25 minutes in a 350°F oven, until the sides pull away from the pans and the tops spring back when pressed gently.
Cool on rack.

When cooled, slice the cake carefully in two halves to get two layers.
(Don't worry if the torte is a little crumbly, it is supposed to be that way.)


In a large, chilled bowl, stir together the cold heavy cream and the strawberry essence, food colouring and sugar. Beat until cream forms stiff peaks.

In a double boiler, melt the sugar, milk, butter and chocolate, till smooth and glossy.

NOW, place one half of the torte on your serving plate. Layer with the whipped cream.
Add the chopped strawberries next. Place the second layer of torte on top.
Pour the icing on top of the layered torte. Garnish with fresh sliced strawberry and dust with confectioners' sugar.

Feast all your five senses!! ;p


Heres' a little "interesting" something I read just recently while helping my sister on her school project work......


Before Luther there was no need for sugar in Europe, because there was an overproduction of honey. This traditional sweetener was a by-product of the apiaries, the main function of which was the production of wax for candles. This product was a monopoly of the Catholic monasteries and convents. Wherever these were closed or abolished, there emerged a market for something that, up to that time, had been a scarce luxury (that came originally from India): sugar. Coincidentally, the discovery and conquest of a New World in the tropics opened up the possibilities for the large scale production of sugar.It became the ideal component for the preservation of fruits.

Another by-product of the Protestant Reformation, due to the newly created scarcity of honey and widespread availability of sugar-cane, was obviously the large scale production of rum and other sugar-cane brandies like the Brazilian cachaça. Earlier brandies were mostly made of wine and, being quite expensive, were consumed only once in a while by aristocrats and the royalty.


This lovely dessert has often been the featured pastry at "Jause" --a lovely old German/Austrian custom of pausing in the afternoon for cake and coffee and conversation.

Cheers to 2009!
I send this over to Jugalbandi for Jai & Bee 's Click Jan '09- Red!

A REQUEST- Please vote for my 'Nut n Fruit Maalpua' here, if you liked it. Voting closes Jan 6th, 2009.


Thursday, December 18, 2008

Cooking with Alicia & Annie--Chocolate Chip Fudge (Brownie)

Fudge brownies are my favourite dessert....(although I don't want to rule out the other options of ice-cream, chocolate, cakes, panna cottas,puddings et al), if possible I would dig in ..and keep digging in my 'huge' plate of fudge brownie with vanilla ice-cream...a match made in heaven!!

I had one this weekend (when my sugar craving had hit again). Its Thursday today and I wanted to taste the chewiness and warm fudginess, all over again. So I made one, this time in my microwave.

Ooey, gooey & chewy Chocolate Chip Fudge Brownies were calling my name!
Everyone loves a good old-fashioned brownie with a tall glass of cold milk. I am no different (except I can skip the milk) ;p. Chocolate Chip Fudge Brownies are so moist and chewy it is hard to resist just one...thats why I made a whole bowl...all for myself !

Here is my variation to the original recipe that I found at Annie's recipes.

Chocolate Chip Fudge Brownie

Ingredients-
1 cup broken squares of unsweetened chocolate
1 cup margarine
2 1/2 cups sugar
4 eggs
1 tbsp vanilla
1/8 tsp salt
1 cup unbleached white flour
1/2 cup semi-sweet chocolate chips


Method-

Melt the broken unsweetened chocolate and butter in a large saucepan over medium heat. Do not burn. Remove from heat.
Using a wooden spoon or spatula, stir in sugar until well mixed.
Add eggs, vanilla and salt and beat well with a fork.
Fold in flour and mix just until smooth. Add the semi sweet chocolate chips to the batter.
Pour into a microwave safe bowl.
Bake at medium high setting for 5 minutes.

Top with vanilla ice-cream and serve while still warm.

I offer this to Cooking with Alicia and Annie's Dec. blog event.

This also goes to JZ (of Tasty Treat) who is hosting her very first event-Santa's Holiday Challenge.

If you are a beginner in terms of baking, this is an easy one-bowl recipe that will surely fetch you appreciation. I send this to Vandana (Cooking Up Something Nice)'s Baking For Beginners' event.

Also, this goes out to Susan (of Food Blogga) for her Eat Christmas Cookies event. You can see a variety of other christmas goodies here.

On my friend, Purva's request I send this to her Christmas Feast Event...its here for you Purva!

"Don't wreck a sublime chocolate experience by feeling guilty."

Wednesday, November 26, 2008

Sinful Chocolate & Luscious Strawberries


"Seize the moment. Remember all those women on the Titanic who waved off the dessert cart."


This was the thought we girls were debating upon, while quite ironically biting into our fresh strawberry-chocolates. Yes, thats what we girls mostly do as many would agree--no matter what we talk about...food is part of the discussion and it is little wonder that we go weak in the knees when it comes to chocolate, when on the other hand we are so strong that we can take on the world. The most beautiful creation of God...although she was made with Man's rib,she has assisted the Gods with their demon slashing.. she is a heady concotion of both gentleness and ferocity.Thats the paradox of a woman,yet it is what makes her intruiging and ofcourse wonderful! (yes keep the cheering on..!)

I have been busy with family and friends (my sis-in-law was here with her friends and it was a girl gathering) lately.

Festivities and family/friends are synonymous. Both complement each other and its almost impossible to imagine either sans the other.So here I have my friends visiting us, for the holidays. Ahhh! Now you know why I have been away for sometime (hope I was missed ;-p).

I have been using the microwave/oven quite a bit lately. With so many girls,so much gossip and so little time. I just wanted a quick and sweet snack/dessert. (As my regular readers would know that I consider desserts are not to be confined to merely after-meal pleasures.)

The girl gang wanted to help me ...ahem! now well my kitchen isn't exactly big enough to accomodate so many girls(6). (There is a space constraint issue in Hong Kong appartments.)

Hence, I decided on chocolate dipped strawberries--which are easy, no-mess, no-fuss,can-be-made-in-the-comfort-of-the-drawing room and quick.

Working together was soooo much fun with the chatting-away-to-glory, no judging, no harm....just sheer joys of girly talks and melt-in-the-mouth choco-strawberries. Quite like the tangy-sweet strawberries and the warm-sinful chocolate. Awesome combination!


Chocolate-dipped Strawberries
Ingredients-
1 packet of semi-sweet chocolate chips (340 gm/12 oz)
1 inch butter cube
2 boxes of fresh strawberries (1 dry pint/8.08oz x 2)


Method-
In a double boiler, melt the chocolate chips with the butter knob.
Mix well to form a smooth, lump-free paste.
Wash and pat dry the strawberries with kitchen towel.
Now, carefully holding the strawberries by the greem stalk dip them in the melted chocolate and give them a swirl to coat the strawberries half-way through.
Place on a tray lined with cookie-sheet. (I made use of the paper-muffin cups for individual strawberries and easy handling.)
Chill for about 30-40 mins in the refrigerator and serve.


N.B. I saved only two for my hubby and (oops!) those are the ones I could click for this post, as the girls didn't have much patience.


This goes out to SriLekha (Me and My Kitchen) for her Event-of-the-Month-November-Sweets.
(Although I had expressed earlier my inability to participate in this event I could not be at peace with myself for not having been able to fulfill a friend's request, SriLekha. So here it goes to you.)


Monday, November 10, 2008

Proof in the pudding.....

"A wise woman puts a grain of sugar into everything she says to a man,and takes a grain of salt with everything he says to her."

----Helen Rowland.

I don't know whether others (like me) have suffered what I like to call the "sugar-magnet" craving.
As a child I sometimes craved for sweets all of a sudden...anything..even plain sugar would do. Unfortunately this has stuck with me over the years. The only thing that has changed is that now plain sugar wouldn't do! A few days back this craving struck, without any warning ....and yours truly had to make 'some' (read 'lots' of) dessert.

I made Fruit Custard (another of my husband's eternal favourites) , to try and keep my dessert a little on the healthier side. ;-) Also, because its so quick!
My earliest memories of custard are when returning after school,we (my bro and me) sneaked into the refrigerator to see if there is something sweet that mom had made...bread pudding, choco-biscuit cake, shahi tukde, sandesh or custard. We secretly smiled at each-other like partners-in-crime,when we saw our sweet-treasures. And even before mom could serve it up for us...we would have attacked the fridge and left only morsels..lol. Mom obviously knew about our sneaking...so she religiously kept some dessert. Well dessert for us kids was not confined to the after meal pleasure, it could be had at anytime during the day-breakfast, lunch, dinner or even in tiffin. lol.

I will do the same for my kids eventually, but for now I'm making my hubby happy..and not to forget myself too! :-)

Vanilla Mixed Fruit Custard--
Ingredients-
2 tbsp custard powder ( I used Brown & Polson, you can use your favourite brand)
3 tbsp packed brown sugar
1 tsp vanilla essence
3 cup skimmed milk
favorite fruits, chopped (banana,mango,strawberry,orange,grapes,gooseberry,pear,apple)

Method-
Heat the milk (leaving 1/2 cup aside) on medium flame, with the brown sugar.
To the half cup milk add the custard powder and mix till lump free.
Now, add this mix to the boiling milk. Remove from heat. Add vanilla essence.
Pour in a separate bowl and refrigerate till cool.

Serve chilled with freshly chopped fruits ( in my case I added the Ritters' Sport Dunkle Voll-Nuss chocolate too !!).